
For those of you who live in regions that have grill season year-round, you are culinarily blessed! Grill season is upon us here in the mid-west. Breaking out the grill for the first meal of spring is practically a holiday.
First things first, to address the age old BBQ debate: dry rub v/s sauce!??! Well, for me, the answer is BOTH. And, actually there is a step prior to that: marinating. Yes, high quality meat should have a wonderful flavor in itself. However, this blog is about enhancing flavors with herbs and spices.
As I shared in my whiskey marinade post (Whiskey Marinade), a marinade is made by combining an oil, an acid and spices. Historically, people used marinades to both tenderize and flavor meat. More recently, however, it has been discovered that marinades don’t really have an effect on how tender the meat is. The cut and quality of the meat and how it is cooked determines how tender it will be. In fact, if certain meats are left in a marinade too long the tissue will break down and the meat will be grainy. Even after soaking several hours, marinades only soak into the outer layers of the meat, not clear through, so it is important that you use a high quality piece of meat to really get the best flavor. For a piece of meat such as the bone-in and skin-on chicken thighs I grilled today, I pierce the skin in several places to help ensure the marinade is absorbed.
You can use any combination of your favorite oil, acid and spices to make your marinade. I prefer a high quality olive oil, and am able to purchase them at a local gourmet olive oil and vinegar shop (www.theolivetwist.com ). The acid can be a vinegar, wine, liquor or even some juices. Some of my favorites are balsamic vinegar, a Chardonnay or Cabernet Sauvignon, whiskey, tequila or lemon/lime juice. Which I use, depends on the type of meat and the flavor I’m trying to achieve. For example, for jerk chicken, I would use olive oil, lime juice, rum or tequila and Caribbean style spices such as all spice, cinnamon, cloves, garlic, nutmeg, habanaro chilies, and thyme. More often than not, my marinades are a combination of what I have on hand.
Next comes the rub. Before putting the meat on the grill, I rub it with a spice mixture. There are a variety of pre-mixed rubs available in many flavors, and if you have a couple that are favorites you could stock those in your spice cabinet. Ground spices, when stored properly, can retain flavor about a year. Certainly, fresh spices have a more potent flavor. When you purchase spices from a grocery store, you have no way of knowing how long it has been sitting. Purchase spices in smaller amounts, about what you think you can use in three months or so. When possible, purchase whole spices and grind them yourself. Store spices in airtight containers in a cool, dry place. Never store above a heat source or in the light because the color will fade and the quality will decline. You can easily concoct your own rub blend if you know which spices go well together and with what types of meat or vegetables. Here is a basic quick reference (this is only a partial list):
Chicken Spices:

Parsley
Sage
Rosemary
Thyme
Garlic
Onion
Saffron
Tarragon
Bay
Cinnamon
Nutmeg
Curry
Lemon & Lime

Beef Spices:
Salt
Peppercorns
Garlic
Oregano
Tarragon
Rosemary
Cloves
Cumin
Horseradish root
Ginger root
Red Pepper
Seafood Spices:

Lemon
Dill
Parsley
Celery Salt
Mustard seed
Red Pepper
Bay Leaves
Cloves
Allspice
Ginger
Cinnamon
Paprika

Pork Spices:
Salt
Garlic
Onion
Thyme
Caraway seeds
Coriander
Curry
Dill
Rosemary
Sage
Cloves
Paprika
Maple
Brown Sugar
Mint
Vegetable Spices:

Mint
Dill
Lemon
Garlic
Cinnamon
Clove
Ginger
Chives
Basil
Thyme
Salt
Peppercorn
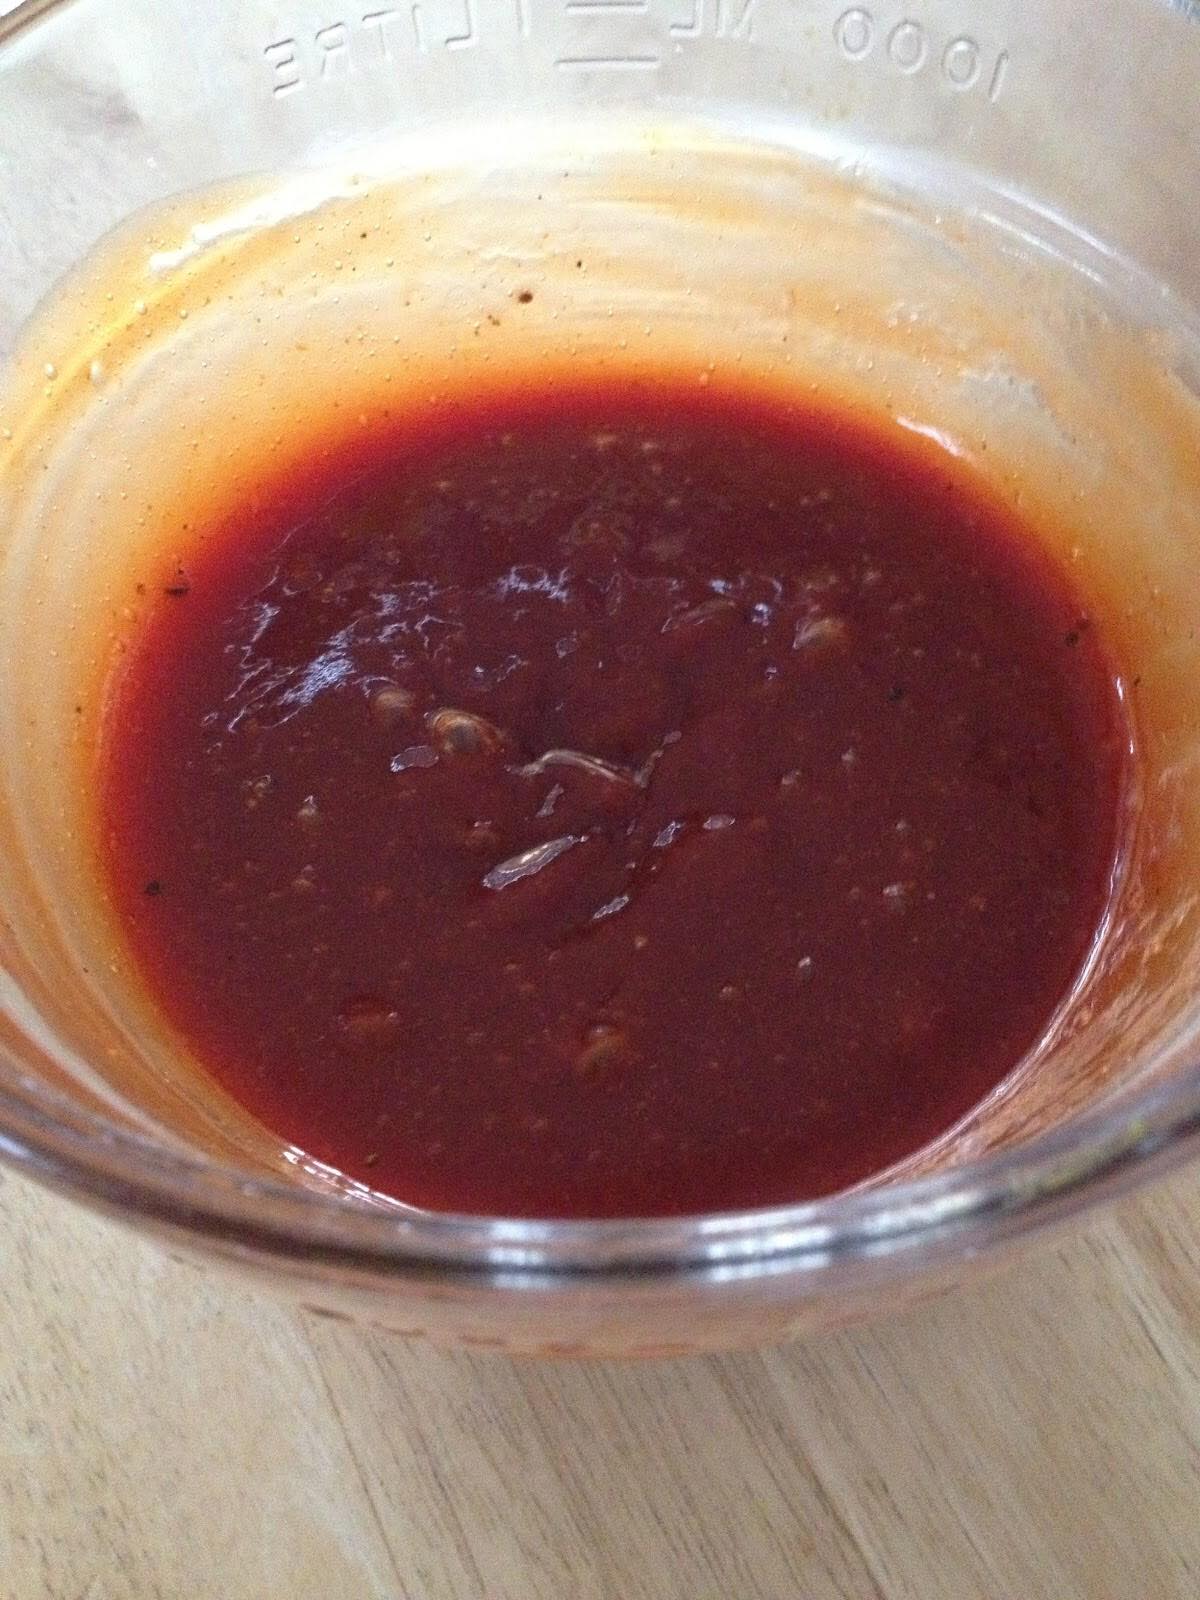
Finally, once the meat has grilled to near perfection, it’s time to add the sauce! Here is a quick and easy BBQ sauce recipe adapted from my mom’s recipe that has been a favorite of our family and friends for years. Now, here’s a problem…I have never measured the ingredients in this recipe, ever! It has always been an add and taste kind of thing, and when we make it, we make a lot! So, I am going to give you a recipe for about 4 cups of sauce and you can adapt to your taste and the amount you need.
BBQ Sauce

2 C Ketchup
1 1/2 T Yellow Mustard
2 C Brown Sugar (I prefer dark, for a richer molasses flavor), lightly packed
1 1/2 T Worscheshire Sauce
2 t Liquid Smoke (optional)
1 t each spice: peppercorn, garlic salt, onion powderWhisk together. Store in a container in the refrigerator until needed.
After marinading for a couple of hours, place the meat on a baking sheet and rub with spice mixture. Grill until just under desired doneness. Brush sauce on meat and grill a couple more minutes until done. Toss your choice of vegetable in the same spices you put in your rub and grill in a grill pan. Using the same spices ties all the flavors of the meal together.
Experiment with new mixtures each time you grill. Grill season is just beginning and the combinations are endless!


One of the primary reasons I started this blog is because I was so often hearing people say how they cook, but they prepared the same foods all of the time and they were bored with their meals. Adding herbs, spices and other flavorings to the most simple recipes can totally change the meal. Be slightly creative with how you present the food, and your partner, family and friends will see you are an amazing cook!
Making something from scratch, or homemade, is healthier, less expensive and can actually be more simple to prepare than you think. A perfect example is pancakes, waffles, cake mixes and breads or biscuits. Instead of spending money on store bought baking mixes, all you need are a few basic pantry items such as flour, baking soda, salt and sugar.
I added vanilla, almond extract and cinnamon to a basic waffle recipe. The flavor takes on almost a desert-like quality. Sweetness also comes from the blueberries. The bacon (I use applewood smoked) gives just a touch of salt, so the waffles become the perfect combination of salty-sweet. Honestly, though I served the waffles with syrup and whipped cream, they are tasty with nothing on them at all.
For this recipe, you do need to have a waffle iron. Though a fancy Belgian waffle iron makes wonderfully thick, fluffy waffles, any waffle iron will do. One quick trick for knowing when your waffle is done: when the steam stops, it’s ready.
Blueberry Bacon Waffles
2 C Flour
4 t Baking Soda
1 T Sugar
1/2 t Salt
2 Med-Lg Eggs
1 3/4 C Milk
1/2 C Vegetable Oil
1/8 – 1/4 t Cinnamon, ground (optional, if you use fresh ground, use the lesser amount)
1 t Almond Extract
2 t Vanilla
1 1/2 C Blueberries (rinsed and drained) Other fruits can be substituted…strawberries are great!
12-14 Slices of Bacon
(Makes 6-7 waffles in my waffle iron)

Beat eggs by hand in a large mixing bowl. Add remaining ingredients up to the vanilla and blend by hand until the lumps disappear. Set aside and do not disturb until you are ready to use the batter. Stirring again will remove the air and lead to less fluffy waffles.

Cook bacon slices to tender-crisp. Drain grease on paper towel. Rinse and drain blueberries. Let dry in colander.
Prepare your waffle iron. Preheat. Even if the iron is non-stick, oil or spray with cooking spray before the first waffle to keep the waffles from sticking.
Place about 3/4 cup of the batter (or follow waffle iron instructions for amount) on the iron. Add a handful of blueberries and two slices of bacon, then close iron.

Serve with butter, maple syrup and/or whipped cream (I do ALL three!!) Leftovers, if you have any, can be placed in a freezer bag and warmed in the microwave for about 1 – 1 1/2 minutes.

Update: I recently used strawberries in place of the blueberries and the waffles were just as yummy!!


Whenever possible I prefer to use the freshest of ingredients. Since I live in the mid-west, I have limited access, mainly mid-summer through autumn, to fresh fruits and vegetables that haven’t traveled long distances in who-knows-what kind of conditions to get to the local grocery store. So, during Farmer’s Market season, I use as much fresh produce as possible and freeze what I can. I hope to master canning this fall. I do bring my herb garden inside in the winter, so I can access fresh herbs year-round.
 We do have access to quality fresh meat thanks to the local farmers and hunters. In our community, we have several great, high quality meat shops. For this fresh ground sausage, find a large cut of pork shoulder butt. If you can get it boneless, it will save you a little time and hassle. Sometimes called just pork shoulder or pork butt, the cut comes from the upper part of the shoulder. This cut is beautifully marbled with fat and connective tissue which helps the meat to be moist and flavorful. I was able to purchase a 7 pound roast to use, and made two recipes: Maple Breakfast Sausage Patties and Italian Sausage.

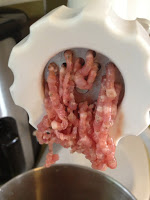
The next thing you need to have is a meat grinder. My stand mixer has a meat grinding attachment.
The two recipes have several spices in common including garlic, salt, pepper, and nutmeg. The other two spices typically found in sausage recipes are paprika and fennel seed.
Paprika is a mildly hot, sweet chili powder. It is often named for the region the peppers are from. They are dried and ground to a bright red powder.
Fennel seed comes from the fennel plant which resembles a fern. The leaves, flowers, seeds, stems and roots of the plant are all used for a variety of purposes from ornamental, to medicinal to edible. The dried seed has a flavor similar to the anise seed like black licorice.

To prepare the pork for the grinder, trim excess fat and cut into chunks. Place in a large bowl. Many recipes have you grind the meat and then blend in the spices.

However, I prefer to mix the spices into the chunks before they go through the grinder so that all of the flavors are evenly distributed throughout the meat. Mixing some water into the meat and spice mixture helps to bind it all together. Feed the mixture slowly into the grinder.
Be cautious, I discovered my meat grinder can throw raw meat about six feet across my kitchen! I found myself having to get the sausage out of my hair, off the wall and off of my clothing when I was finished. Ha!
 Maple Breakfast Sausage
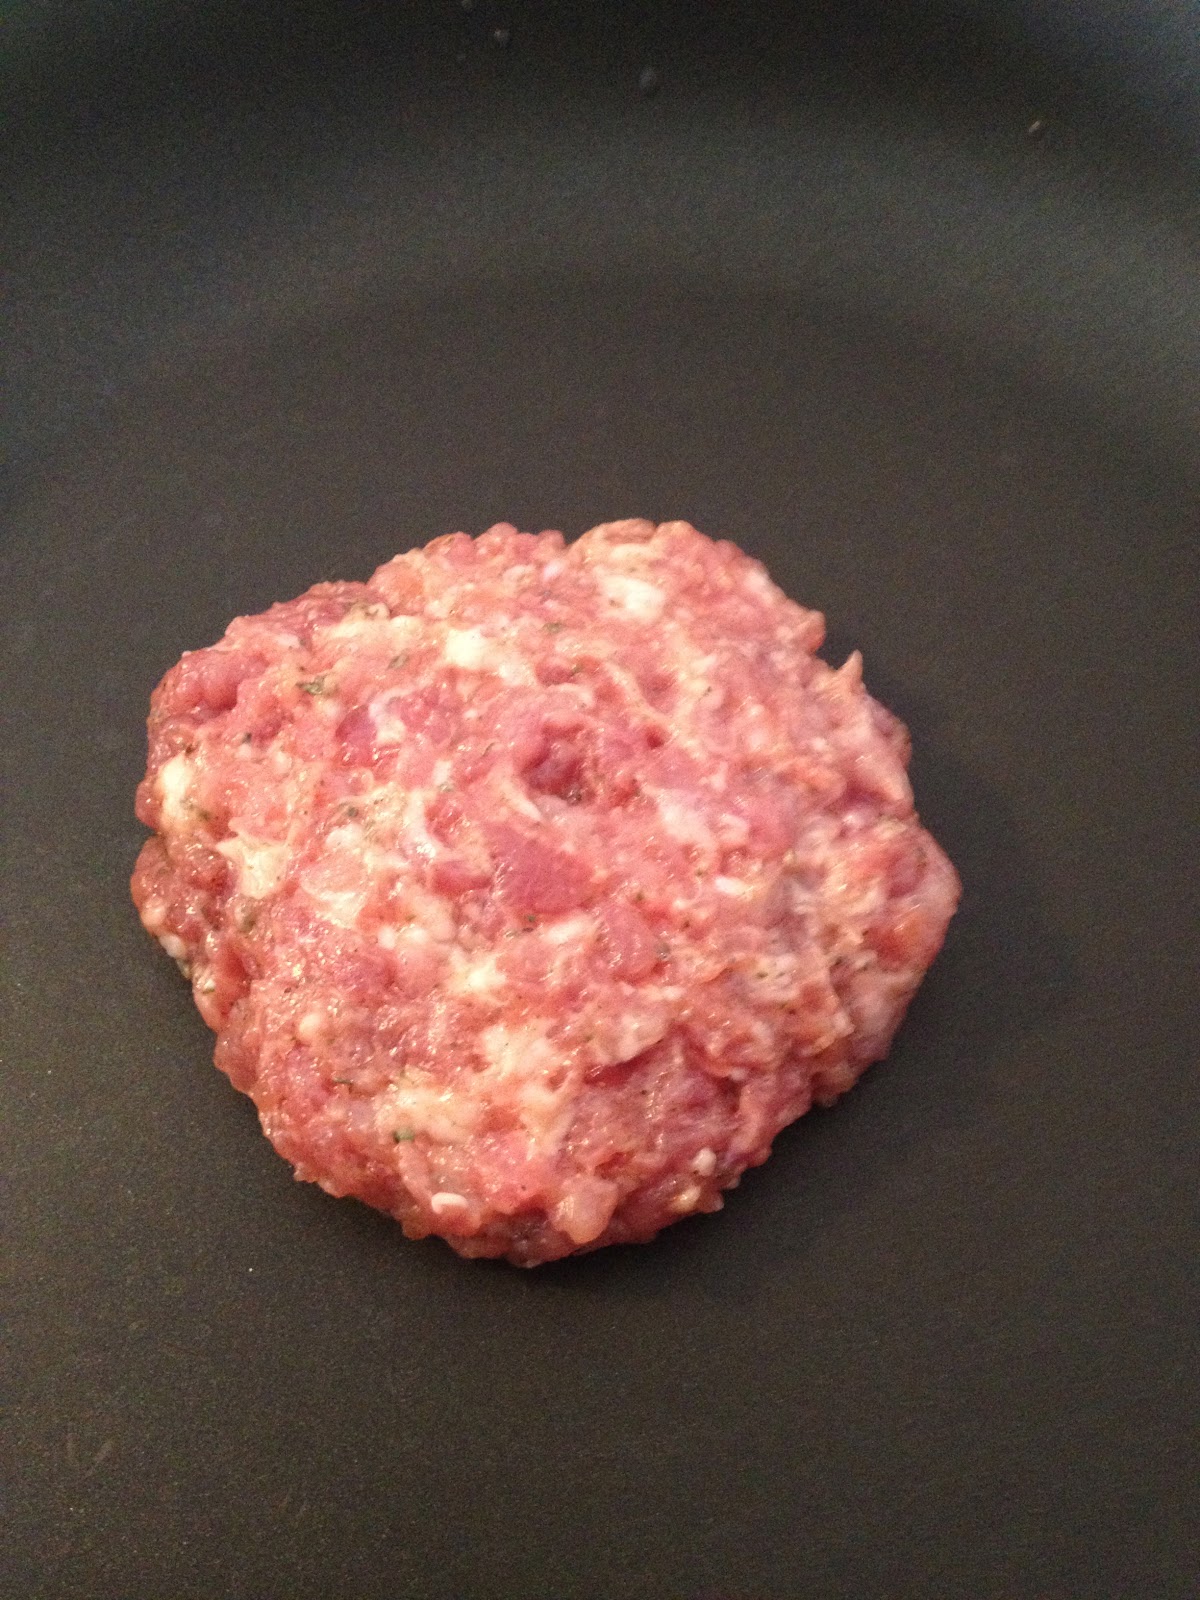
3lbs Pork
2t Kosher Salt
1t fresh ground* Peppercorns
2t fresh ground Sage
2t fresh ground Thyme
1t fresh ground Parsley
1T Brown Sugar
1t fresh grated Nutmeg
1/2t Paprika
1/2t Fennel Seed
1/2C Maple Syrup
1/2C Water
 Spicy Italian Sausage

3lbs Pork
4-5 cloves Garlic, minced
1t Kosher Salt
1t fresh ground Peppercorns
1T fresh ground Parsley
1/2T Italian Seasoning
1/2t crushed Red Pepper Flakes
1/2t Paprika
1/2C Water

I make my sausage patties kind of large, 3lbs of sausage made about 26 patties. I then freeze the patties and pull out as many as I need for a meal, many times that meal is brinner for us (breakfast for dinner!).
The Italian sausage became one of the many tasty ingredients on the homemade pizzas for my son’s birthday party. I divided the sausage into 3 – 1lb packages. I browned one for pizza and froze the remainder.

The biggest difference between purchasing store bought, ready-made sausage and making it fresh, other than being able to control the ingredients, is the texture. Store bought sausage is almost rubbery in texture, where the fresh is tender. Depending on how much trimming you did, you will also notice a difference in the amount of grease produced while you are cooking. Making your own sausage is fun…so if you have the equipment, give it a try!!

One of my favorite restaurants has an appetizer called Bleu Cheese and Caps which is small sautéed mushroom caps served on a bed of large, crunchy croutons topped with melted bleu cheese. I order it every time and eat every last bite! I have adapted the recipe and bake it on flatbread. Preparing the dish on the flatbread allows for it to be served as a finger food that is much easier to eat.
This recipe incorporates two of my very favorite flavors: garlic and rosemary. It is important to use fresh rosemary for its tenderness. When dried, rosemary becomes quite brittle and sharp, and it doesn’t soften when used in cooking. You can use whatever your choice of mushroom is. There are a variety of edible mushrooms. For a stronger flavor that compliments the garlic and rosemary, use a baby Portabella or even a Shiitake. However, white button mushrooms work fine as well. Mushrooms are not just perfect for adding flavor to dishes, they are also known for many health benefits and are a good source of vitamin D and fiber. Mushrooms are like mini-sponges though, so do not wash them under water because they will absorb the water and become mushy when cooked. Just take a damp cloth and wipe them clean.
Caps and Bleu Cheese Flatbread

2 Pieces of Flatbread (pre-packaged or homemade is fine)
2T Olive Oil (I use Garlic Infused Olive Oil from www.theolivetwist.com)
4-6 Mushroom caps, button or baby Portabellas will work, sliced depending on the size
3-5 Garlic cloves, thinly sliced
3/4C Gorgonzola Cheese crumbles
1t fresh Rosemary, chopped
4-6 Mushroom caps, button or baby Portabellas will work, sliced depending on the size
3-5 Garlic cloves, thinly sliced
3/4C Gorgonzola Cheese crumbles
1t fresh Rosemary, chopped

Preheat oven to 350 degrees. Lay the flatbread on a baking sheet. Drizzle heavily with Olive Oil. Layer the mushrooms, garlic and cheese on the bread. Sprinkle with chopped rosemary. Drizzle with olive oil.
Bake for 12-18 minutes until the bread is toasty, the mushrooms and garlic are soft and the cheese is bubbling. Place under the broiler for 2-3 minutes to brown the cheese slightly.

Slice, garnish with a sprig of rosemary and serve. This appetizer is great hot or at room temperature, so it is perfect for parties.
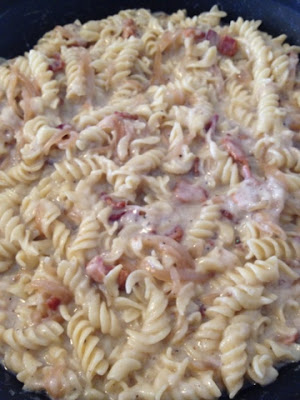

If it weren’t for comfort foods, I probably would never have to exercise again! Okay, not really. But why is it that the foods Americans so often refer to as “comfort foods” always include pasta, bread, cheese and/or gravy!??! Not the healthiest choices by far, but I am definitely an “everything in moderation” kind of girl! This recipe is one of my very favorites. I mean, how can something with cheese, caramelized onions, bacon and wine be wrong??
This recipe uses one of my favorite cheeses, Gruyere. Gruyere is a hard, yellow cheese. It is sweet but slightly salty, with a flavor that varies widely with age. It is often described as creamy and nutty when young, becoming more earthy as it ages. It is a great melting cheese and is often used in fondues, quiches, and on French onion soup.
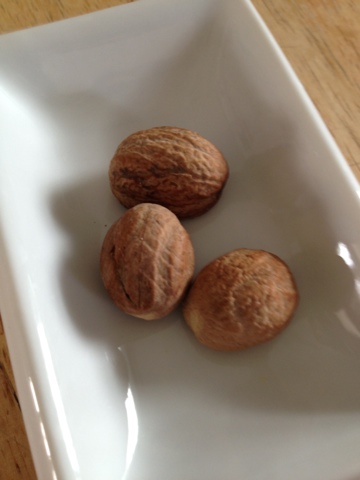 It also calls for an ingredient that surprises some people, nutmeg. I use nutmeg in many savory dishes including my chili for an added depth to the flavor that will have people asking what they are tasting. Nutmeg is the hard, brown seed from the nutmeg tree which is a tropical evergreen tree. Most cooks prefer to grate it fresh from the seed. The seed should be stored in an airtight container, away from heat, moisture and sunlight. Though there is some disagreement about storing dry spices in the freezer because they may lose potency, I do store my nutmeg seeds and my ginger root in the freezer. I pull them out and grate them fresh whenever I need them. I store them for many months, and have not noticed either losing any flavor or aroma.
Grown-up Mac and Cheese
1lb pasta – I prefer a short cut textured pasta such as: spiral, gemelli, cellentani, penne rigate that can grab onto the cheese
1T Olive Oil – I use my favorite Picholine from a local shop The Olive Twist (www.theolivetwist.com)
1/2lb Bacon, chopped
2 Medium Onions, thinly sliced
1/2C Wine (a dry white is great, but use whatever favorite white or blush you have on hand to drink)
2T Butter
2T Flour
1C Milk
1C Chicken Broth
2C Gruyere, shredded (regular Swiss would work fine, I just like the nuttiness of Gruyere and how well it melts)
1/2t nutmeg, fresh grated
2-3 drops Hot Sauce
1T Spicy brown or Dijon Mustard
Salt & Pepper
Cook pasta as directed on package to al dente. Don’t overcook because the pasta will continue to cook in the sauce.
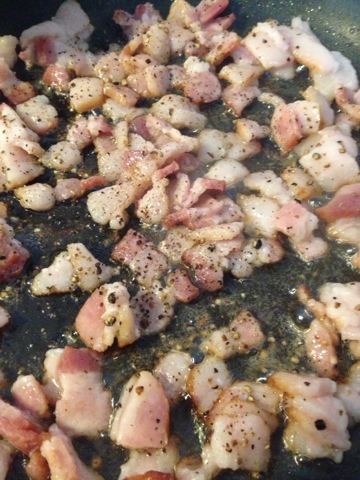
While the pasta cooks, heat olive oil in a pan. Crisp the bacon in the olive oil. Remove the bacon, reserving the oil and bacon grease in the pan.

Add the onions and cook over medium heat until softened and just beginning to caramelize. Add the wine and reduce 1-2 minutes. At this point, your kitchen will smell amazing!!

Add the onions and cook over medium heat until softened and just beginning to caramelize. Add the wine and reduce 1-2 minutes.

As the onions cook, in a saucepan, melt the butter and whisk in the flour to make a roux. After a minute or two, whisk in the broth and milk. Allow to thicken several minutes then add salt, pepper and nutmeg to taste. Add a few drops of the hot sauce. Whisk in the mustard.
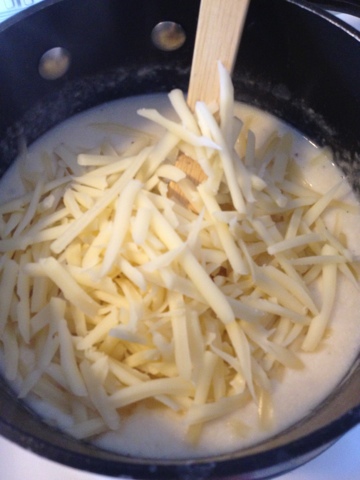
Remove from heat and stir in the shredded cheese, a little at a time to melt into the sauce.

Pour the cheese sauce into the pasta and toss together. Serve with a leafy green salad and crusty bread…and a glass of the wine you opened, of course!
Comforting Comfort Food: Grown-up Mac and Cheese
Author: Changing Seasonings
Recipe type: Lunch, Dinner
Cuisine: American
Prep time:
Cook time:
Total time:
Serves: 8 servings
Ingredients
- 1lb pasta - I prefer a short cut textured pasta such as: spiral, gemelli, cellentani, penne rigate that can grab onto the cheese
- 1T Olive Oil - I use my favorite Picholine from a local shop The Olive Twist (www.theolivetwist.com)
- ½lb Bacon, chopped
- 2 Medium Onions, thinly sliced
- ½C Wine (a dry white is great, but use whatever favorite white or blush you have on hand to drink)
- 2T Butter
- 2T Flour
- 1C Milk
- 1C Chicken Broth
- 2C Gruyere, shredded (regular Swiss would work fine, I just like the nuttiness of Gruyere and how well it melts)
- ½t nutmeg, fresh grated
- 2-3 drops Hot Sauce
- 1T Spicy brown or Dijon Mustard
- Salt & Pepper
Instructions
- Cook pasta as directed on package to al dente.
- While the pasta cooks, heat olive oil in a pan.
- Crisp the bacon in the olive oil.
- Remove the bacon, reserving the oil and bacon grease in the pan.
- Add the onions and cook over medium heat until softened and just beginning to caramelize.
- Add the wine and reduce 1-2 minutes.
- As the onions cook, in a saucepan, melt the butter and whisk in the flour to make a roux.
- After a minute or two, whisk in the broth and milk.
- Allow to thicken several minutes then add salt, pepper and nutmeg to taste.
- Add a few drops of the hot sauce.
- Whisk in the mustard.
- Remove from heat and stir in the shredded cheese, a little at a time to melt into the sauce.
- Pour the cheese sauce into the pasta and toss together.
 I just want to say a ginormous Thank You! to everyone who takes the time to peruse my blog. Whether you land here on accident or by choice, I hope you find something of interest and are inspired to try something new by adding herbs and spices to your cooking.
I am excited that I have reached over 2,500 page views from people in 13+ countries. I am grateful for Facebook, Pinterest, Blog Spot and other search engines for getting my posts out to so many people. And, I am thankful to everyone who “pins” my recipes or shares them with others. Changing Seasonings was recently accepted to a food blog registry, Foodblogs.com, so welcome to any new readers! I have tried to make reading the posts as easy as possible for everyone by including the translator and food term dictionary widgets.
Don’t miss a single post by signing up to receive the next posts via your email or add Changing Seasonings as a favorite on Blog Spot or Foodblogs.com!
Lastly, please comment, comment, comment!! I want to know what works, what doesn’t, what ideas my recipes inspire for you, what questions you have. There is a comment space at the bottom of each blog, and I have the settings so that you don’t have to be a registered Google or Blog Spot follower to comment…anyone can make comments!
 |
| Grown-up Mac N Cheese…Mmmm! |
I have bunches of recipes ready to write about. I just have to make the time to get them posted. Coming soon are my quick and simple marinara sauce, a tasty grown-up version of mac n cheese, a savory oatmeal, and mashed potato and cauliflower potato cakes. I’ve made myself hungry typing this…
Thanks again! I’m looking forward to reading your comments!!

I live in a rural part of northeast Indiana. The nearest Thai restaurant is about 45 minutes away, so when I had a Thai craving it went unsatisfied…until recently. After much searching and adapting, I have put together a Thai inspired feast that is spicy and simple.
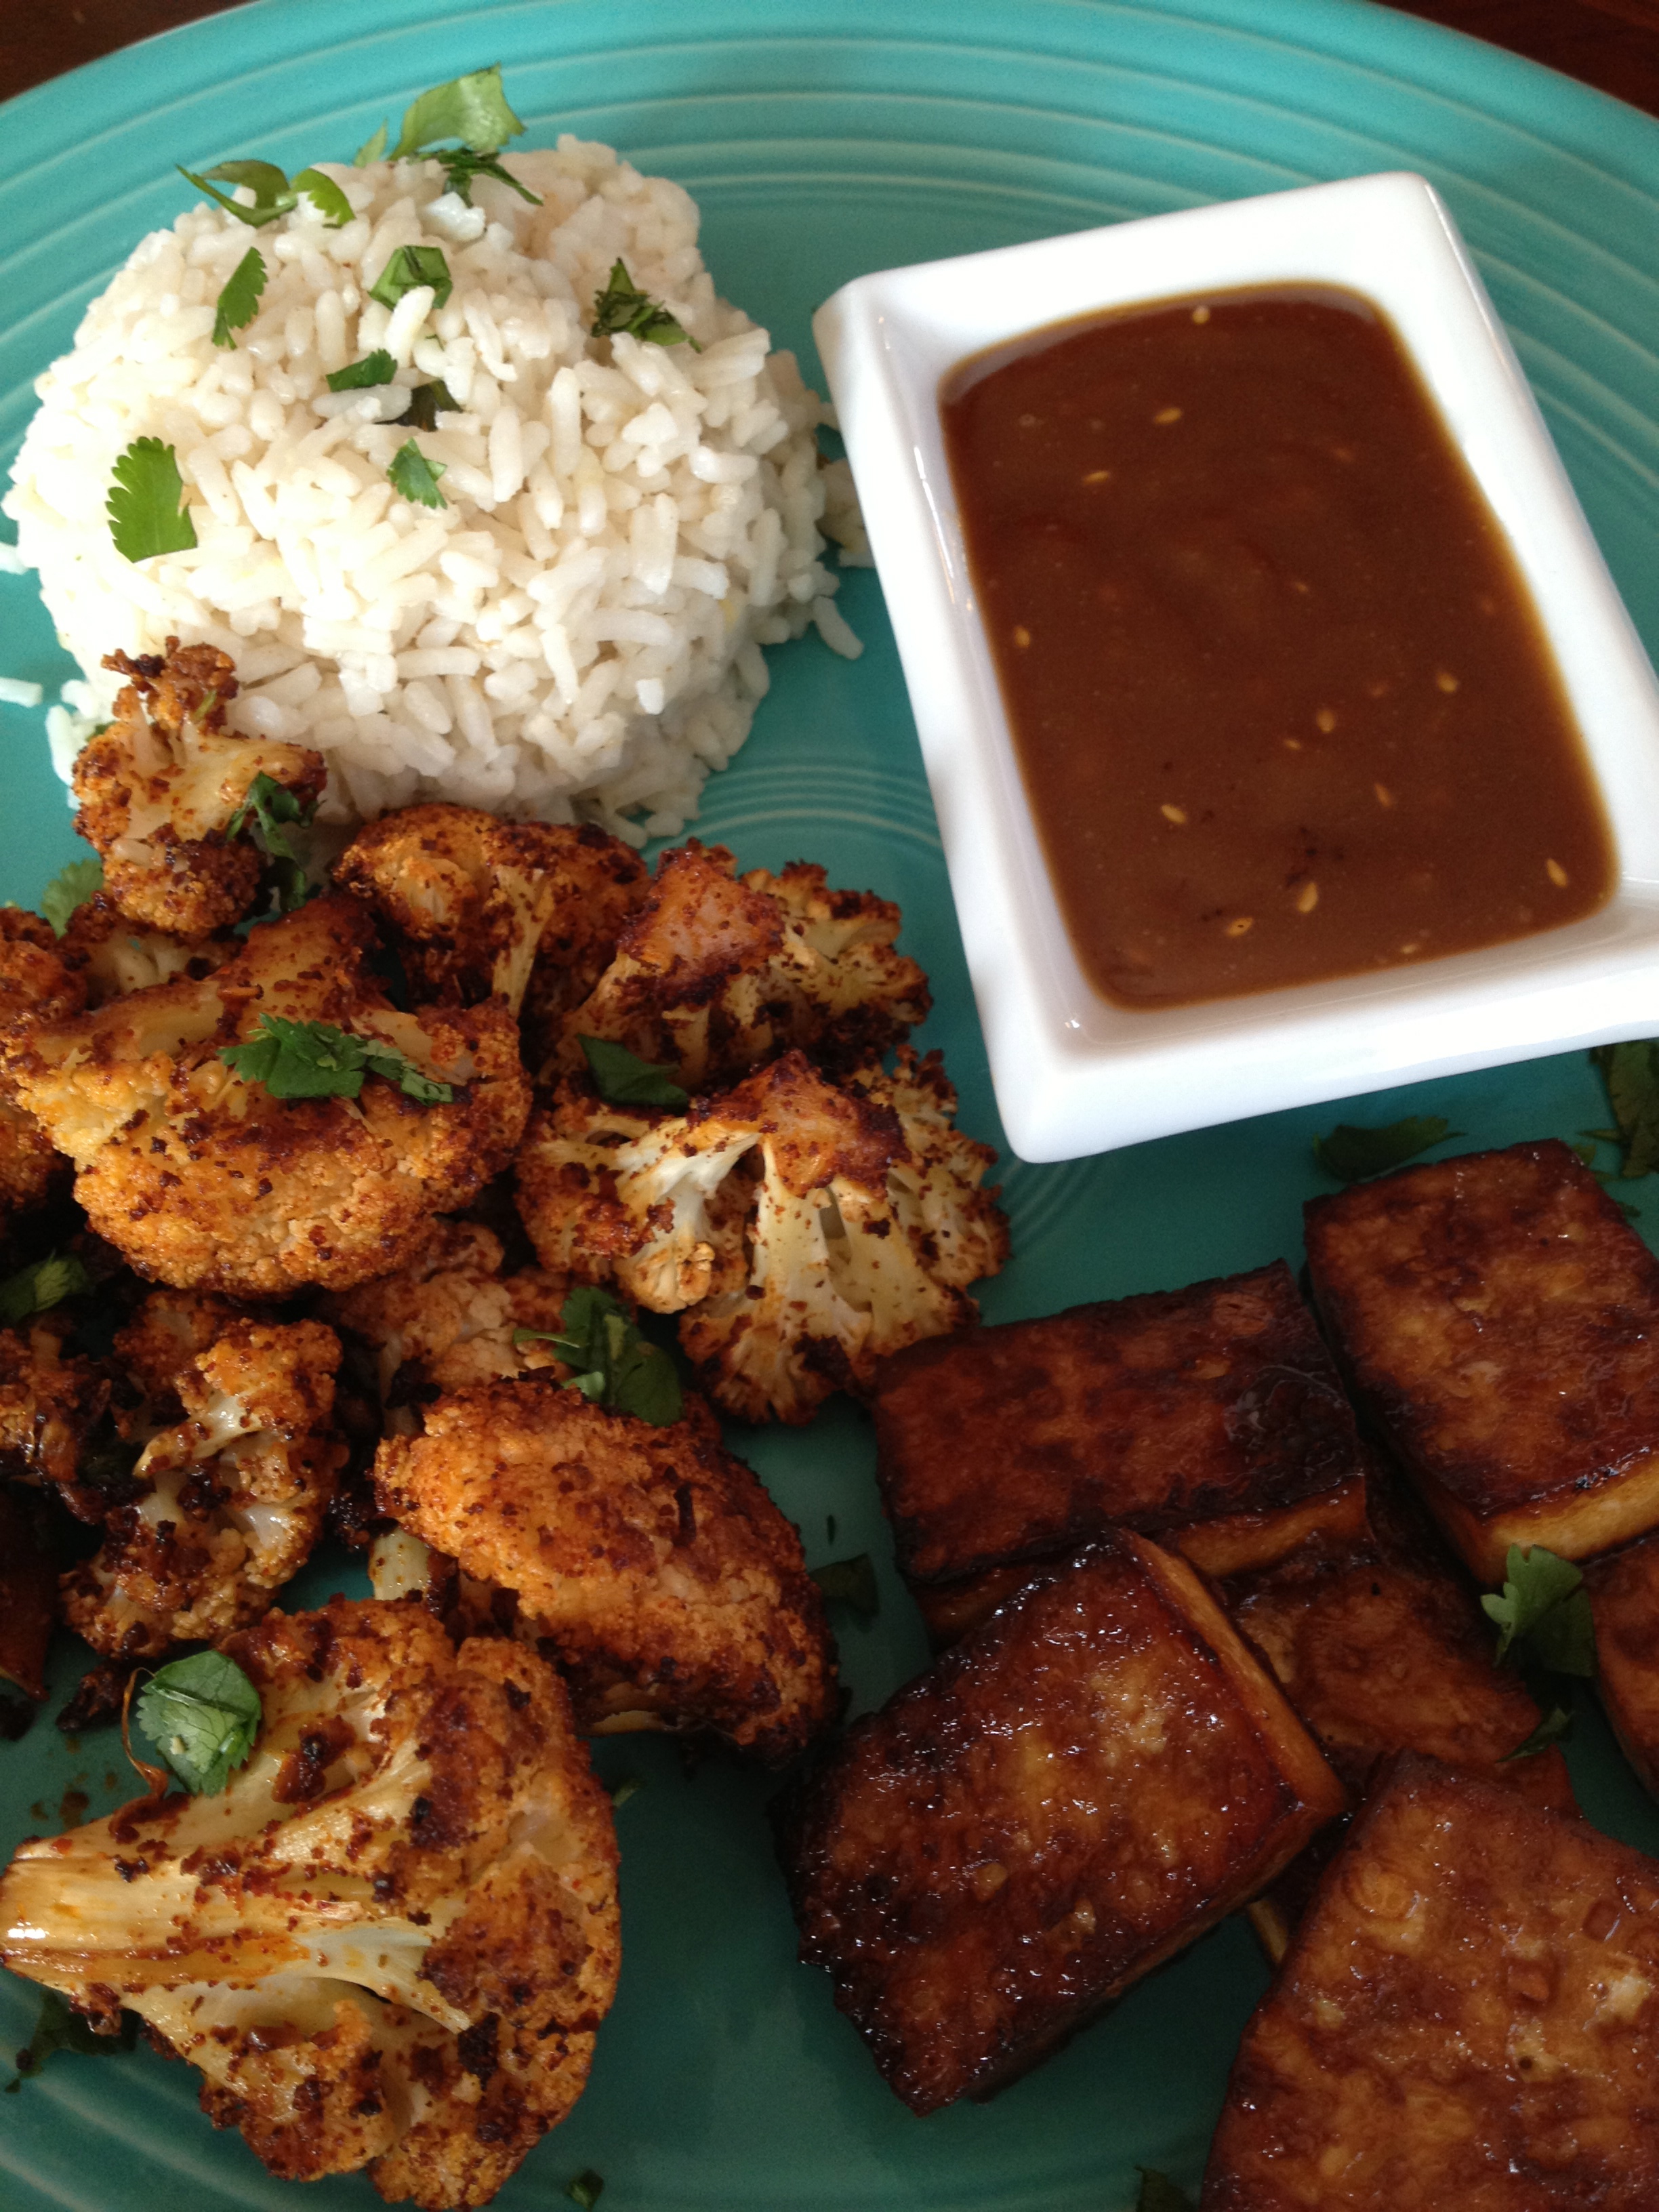
I tied together the flavors of the dishes with the crushed red chili pepper and lime. The meal includes Chili Lime Roasted Cauliflower, Chili Lime Grilled Chicken Satay Skewers and Roasted Tofu with a Thai Peanut dipping sauce on Coconut Milk Rice, and Pad Thai noodles. I love the spiciness of Thai, and all of these recipes are plenty spicy. I do not recommend adjusting the heat at all until you’ve sampled first.

First, the base of the Pad Thai, Peanut Sauce and the marinade for the Chicken and Tofu is a spicy sesame oil made by combining 1 C of Sesame Oil and 2 T crushed red chili peppers in a small saucepan and heat over medium heat for 2-3 minutes. Pour through a strainer to remove pepper flakes. Reserve oil for use in the following recipes. And, in case you skipped the last line of the previous paragraph, do not add extra pepper…this will be plenty hot!

Thai Peanut Sauce
1T Peanut Butter
2T Spicy Sesame Oil
2T Soy Sauce
1T Brown Sugar
1t Siracha Sauce
1t Sesame Seeds (I like mine toasted)
Whisk together. Set aside as dipping sauce for chicken, tofu and cauliflower.

Chili Lime Roasted Cauliflower
1 Head of Cauliflower
3 Cloves of Garlic, minced
1T Red Chili Powder
1/2t Crushed Red Pepper Flakes
1t Cumin
4T Olive Oil
1/4C Cilantro, chopped
Juice of 1/2 Lime
Kosher or Sea Salt
Preheat oven to 325 degrees. Clean the cauliflower and cut apart florets. Mix together the remaining ingredients, reserving half of the cilantro for garnish. Toss with cauliflower in a large bowl. Place on a baking sheet. Roast 1- 1 1/2 hours, turning occasionally. Garnish with a squeeze of lime juice and the remaining cilantro.
 Chili Lime Roasted Tofu

1 Tofu block, cut in 1/2 inch cubes
Juice of 1 Lime
1 Clove of Garlic, minced
1t Red Pepper Flakes
3T Spicy Sesame Oil
Mix the ingredients. Place the tofu in a dish and cover with marinade. Refrigerate for 30 minutes. Preheat oven to 400 degrees. Place tofu on a baking sheet and roast for 20 minutes. Turn halfway through cooking time.

Coconut Milk Rice
Basmati Rice
Chicken or Vegetable Broth
Coconut Milk
1t Fresh grated Ginger
1/2t Fresh ground Clove
1T Cilantro, chopped
Prepare rice as directed on package, but substitute equal amounts of broth and coconut milk for the water. Add ginger and clove. Once fluffy, toss in the chopped cilantro.

Chili Lime Chicken Satay Skewers
1lb boneless skinless chicken thighs (you can use breasts if you prefer)
3T Soy Sauce
2T Honey
1T Spicy Sesame Oil
Juice of 1 Lime
2 Cloves Garlic, minced
1-2t Siracha
Red Pepper Flakes
2T Cilantro, chopped
Bamboo Skewers (soak in water for 20 minutes so they won’t burn on the grill)
Mix the ingredients, reserving 1T of cilantro for garnish. Cut the chicken into pieces to skewer. Place the chicken in the marinade and refrigerate for an hour. Skewer the chicken pieces. Grill for 6-8 minutes per side. Garnish with lime juice, lime slices and chopped cilantro.Pad Thai
1/2C Spicy Sesame Oil
4T Brown Sugar
6T Soy Sauce
Splash of Siracha
Juice of 1 Lime
1 box Linguine, Angel Hair pasta or Rice Noodles
2T Olive Oil
1/2C Green Onion, chopped (separate greens from the whites)
1/2C Carrots, grated
1/2C Cilantro, chopped
2 Cloves Garlic, minced
1 Egg (optional)
1/2C Peanuts, roughly chopped
Mix together the first five ingredients. Set aside. Prepare noodles as directed on package. Heat olive oil over medium-high heat. Sauté the white part of the onion, carrots and garlic. Scramble in egg if desired. Reduce heat. Toss in noodles and add sauce. Garnish with chopped peanuts, green onions and cilantro.
This is a lot of food! I actually made the Pad Thai and Chicken Satay skewers with Peanut Sauce for one meal, and then had the cauliflower, tofu and rice for another meal…my meatless meal for the week. Once you have the Sesame Oil and Siracha in your pantry, these actually end up being very economical too. Considerably less than ordering take-out, if you live closer than I do to a Thai restaurant!

Once upon a time, my mom came for a visit. She swooped in the door with a plate wrapped in paper towel and said, “you have to try this…it’s like eating eggplant chips!” They weren’t even warm, but they were crisp and flavorful. Very tasty! So, it was time to experiment a crispy fried eggplant recipe. This fried eggplant is great to just munch on by itself, but it also pairs perfectly with the simple tomato basil sauce in an upcoming post.
Eggplant is a vegetable that has bragging rights for being near the top of the list of “Brain Foods” due to it’s fiber content, vitamins, minerals and antioxidant properties. It is a flavorful and versatile food. Though there are many varieties, the typical eggplant found in America is pear-shaped and purple in color. Eggplant should be firm and the skin smooth and shiny without scars or discoloration. They are very perishable, so plan on using within a few days of purchase. Do not clean or cut prior to storing. Eggplant can be eaten with or without the skin, which can sometimes be bitter. To prepare eggplant for use, cut it with a stainless steel knife and sweat the liquid out of the vegetable by placing it on paper towel and sprinkling it with salt. Let sit for about 30 minutes and then dab the excess liquid off with another paper towel. If you need to, you can rinse to remove the rest of the salt. For this recipe, I leave the salt.


There are so many options for the breading. To keep this recipe simple, store bought crumbs are the easiest though they do have a higher sodium and sugar (corn syrup) content. A benefit of store bought crumbs is that they can be purchased with Italian seasoning. If you don’t have bread crumbs on hand, you can make your own with bread, crackers or even cereal. Just pulse in a food processor or spice grinder. Add Italian seasoning and you have seasoned breadcrumbs with control of the ingredients. If you do not have pre-mixed Italian Seasoning, you can make it by blending dried basil, oregano, thyme, rosemary, and marjoram. Some also include black pepper, garlic and red pepper flakes. For a healthier version of store bought breadcrumbs that have less additives and cook nice and crisp, use Panko breadcrumbs. For this recipe, I add grated Parmesan cheese to the breadcrumbs.

Crispy Fried Eggplant
1 Medium Eggplant with skin on, thinly sliced and sweated
1-2+ T Course ground Kosher Salt or Sea Salt (regular table salt will work)
1 1/2 – 2 C Seasoned Breadcrumbs
Binder for breading (this can be a couple eggs or egg whites beaten with a liquid added such as water or milk, or just milk)
1/4 C Grated Parmesan Cheese
Olive Oil* (to cover the bottom of the pan about 1/4 in)
*Higher quality, extra virgin olive oils have a higher smoke point or can be heated higher without burning. I use my favorite oil from a local shop, The Olive Twist (www.theolivetwist.com).
 Because this is what I would consider a lightly breaded recipe, I don’t use the typical three-step dredging process. Set-up your area like a little assembly line: frying pan with heated olive oil, bowl of seasoned bread crumbs and cheese mixture, bowl of egg/milk, sliced eggplant already sweated. I try to use the wet hand – dry hand method, but typically goof up and use the wrong hand so I end up with fingers that look like Sasquatch fingers. Dip the eggplant in the liquid and then transfer to the breadcrumbs. Cover completely with breadcrumbs by flipping the piece over. Place gently in the heated oil. Because these are so very thinly sliced, they do not take long to cook. Fry a few minutes on each side until a golden brown.
Remove from the pan and place on paper towel to remove excess oil. Remember to constantly change the paper towel to keep the food from reabsorbing the oil and becoming soggy. Sprinkle with salt. This is one of those things that are lucky if they make it to a plate because I eat them as quickly as they come out of the pan! Keep warm on a baking sheet in a low temperature oven.
Serve with your favorite pasta topped with marinara for a perfect Eggplant Parmesan. Sprinkle additional Parmesan cheese or top with melted mozzarella.


As I mentioned before, all of the wonderful holiday gatherings we attend bless us with the opportunity to visit with family and friends, and with an abundance of leftover meats, cheeses and vegetables. A couple days after Christmas, I woke craving quiche. What a perfect use for the leftovers in my refrigerator!
I love to cook, however baking is not really one of my strong skills. Probably because it requires more precise measurements and I rarely measure anything (in fact, I often struggle to figure out the actual measurements for the recipes I post in this blog!), and because it seems to take a bit more patience. This crust is very simple and forgiving.

Crust
2 1/2 C Flour
2 sticks cold butter – cut
1 t Salt
1 t Sugar
4 T (+ up to 4 T more) Ice Water
 Mix the flour, salt and sugar in a bowl. Add the butter, mix into the flour with a pastry cutter. Blend until the mixture is crumbly. Add the ice water, 1 tablespoon at a time and work into the flour with your hands. Be careful not to over work it. When the dough forms, divide in half and form to balls.
Press into disks between plastic wrap and refrigerate for at least an hour. Roll dough onto a flour surface until it’s about 14in round. Roll onto the rolling pin and transfer to pie dish. Press into the dish and form the edges of the crust. For those of us who aren’t pastry chefs, the term “rustic” was invented. I just smoosh (highly technical cooking term!) the crust so that it’s even around the dish.
Quiche Filling
 6 eggs
1 C Low-fat small curd Cottage Cheese
1 C shredded Swiss Cheese
1/3 C each chopped green onion, chopped red pepper and crumbled bacon (I would have added mushrooms too if I had any!)
1/2 C Ham
1/2 t each parsley, thyme, salt, pepper (I also added a pinch of fire salt)
1/4 C grated Parmesan
 |
| Beat the eggs and stir in the cottage and Swiss cheeses. |
 |
| Add the meat and vegetables. |
 |
| Blend parsley, thyme, salt and pepper. Add to egg mixture. |
 |
| Add grated Nutmeg. |
 |
| Pour into the pie crust and sprinkle the Parmesan cheese on top. |
Bake at 375 degrees for about 40 minutes or until the crust is golden brown and the quiche is firm in the middle. I put the broiler on for a couple minutes to brown the cheese on the top. This quiche is light and moist. Serve with fruit for a tasty breakfast, lunch or dinner. It is just as wonderful warmed the next day too!!

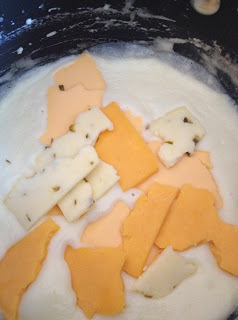

Ahh the holidays! Food, food and more food! It never fails that more than one typically non-cooking friend or family member brings a cheese tray to the holiday gathering. Now, don’t get me wrong…I adore cheese! However, you will inevitably have cheese left over after your event and there is only so much cheese and crackers any of us can handle. Other than using it for a toasty grilled ham and cheese, there is something very simple you can do with all that cheese. A quick cheese sauce. The cheese sauce can become a creamy fondue that can turn that leftover veggie tray into a fun and tasty meal. It can also be used as a base for a turkey tetrazzini or homemade macaroni and cheese.
 Cheese Sauce

(for about 4 cups of sauce)
4 T Flour
4 T Butter
3 C Milk
4-6 oz Cheese (variety of types)
Hot Sauce (several drops)
1/2 t Nutmeg (fresh, grated)
 Start by making a roux. The amount will depend on the amount of sauce you want to make. A roux is basically made from equal parts of butter (or some fat) to flour. Melt butter over medium high heat. Add flour, whisking for several minutes until the mixture turns a light brown and a nutty scent develops. Make a béchamel sauce by pouring in milk slowly, whisking constantly. The mixture will thicken. Continue to add milk to desired consistency. Add the cheese. When I am using leftover cheese tray slices, I just tear them as I put them in the pan. Add several drops of hot sauce and grated nutmeg.
You now have a versatile cheese sauce that can be the base for so many recipes. Add cooked pasta for a homemade macaroni and cheese. To utilize other holiday leftovers such as meats or crudités, stir in pasta, leftover turkey, chicken or ham and peas, mushrooms or broccoli and bake for a tetrazzini casserole. Or, put in a fondue pot and serve with fresh vegetables, day old bread chunks, fresh fruits and pretzels.