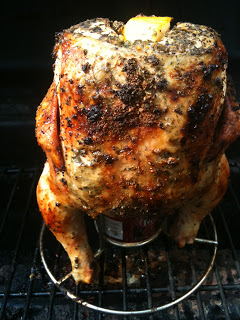
Beer Can Chicken, Beer Bum Chicken, Beer Can Roasted Chicken…whatever you call it, the end result is the same: tender, juicy, flavorful chicken! And, for those of you who might not drink or don’t particularly care for the flavor of beer, fret not! Any can of soda can be used in place of the beer, so just insert your favorite soda (a lemon-lime soda is great for this!) wherever the blog mentions beer. If you notice, the can pictured above is actually a Dr. Pepper can, but only because we buy our beer in bottles. After I finished the pop, I rinsed the can and then poured the beer into it.
This is the perfect recipe for making a tender roasted chicken without heating up your kitchen and with minimal attention. It can be made on any type of grill, though having a grill with multiple burners is helpful because the chicken cooks with indirect heat. If you only have a single burner grill, it can still be done, just place small pieces of foil around the bottom of the chicken legs to keep them from scorching. For charcoal grills, after preheating, move the charcoal to one side of the grill for indirect heat. A few other grill tips: remove the top rack if you have one and be sure the top of your grill is deep enough to close over the chicken standing on end; preheat the entire grill, then turn the heat off on one side or the middle if there are three burners; and, it isn’t necessary to have a fancy gadget for holding the chicken because the can and two legs will serve as a tri-pod.
As with any meat dish, the spices you can chose for flavor are endless. And, as with most of my recipes, my choice is influenced by cravings and which herbs and spices I have on hand. I had a large bag of lemons in the fridge, so I went with Thyme as the basis for the rub. Thyme can have a slightly lemony flavor, and while it is potent and slow to release its flavor, it will not over-power and blends well with other spices.
Lemon-Thyme Chicken Rub:
Equal parts each – Thyme, Parsley, Coarse Ground Pepper, Garlic Salt, Celery Salt and Chives
Sprinkle about a tablespoon of the rub into the can 1/2 – 3/4 full of beer. I also squeezed some lemon juice in the beer spice mixture.
Set the beer can on a baking sheet (in a holder if you have one). Place the chicken over the can (trying to find the words to nicely say stick the beer can up the chicken’s bum).
To make a dry paste-like consistency, squeeze the juice of half a lemon and add about a teaspoon of minced fresh garlic to the rub. Reserve the other half of the lemon to put in the “head hole” at the top of the chicken to help contain the steam and juices, and add additional flavor to the chicken. A potato or an onion can also be used for this purpose.
Rub the spice mixture all over the chicken. Be sure to rub between the skin and the meat. Don’t forget to cover every part (even in it’s little arm pits…or I suppose it would be wing pits!?!). Cut a small slit just above the thigh and inset the tip of the wing (like the chicken has its “hands” in its pockets) to keep the tips of the wings from scorching. Wrap small pieces of foil around the bottom of the legs, like little shoes, to keep them from scorching.
Place the chicken on the grill over indirect heat. For a 3-4lb chicken, cook approximately 80 minutes or until the juices run clear and the internal temperature is at least 165 degrees. Because I have a three-burner grill, I rotate the bird about every 20 minutes to ensure even browning.
Let the chicken stand for 5 minutes before cutting to allow the juices to redistribute. The meat will be so tender that you will be able to just pull the chicken apart. Even the breasts, which tend to be dry, will be moist and juicy.
Even though the skin is not the healthiest part of the chicken, it will be impossible to resist! When my children say, “eeeew! I don’t want that part!” I get so disappointed…wink, wink! We paired the chicken with some fresh green beans, steamed until tender crisp and then sautéed in a little olive oil, real butter, minced fresh garlic and a squeeze of lemon juice to tie the flavors together. Corn on the cob goes great as well. Enjoy this start to the grilling season!
Another summer favorite is a great use for any leftover chicken! The last time I grilled one of these tasty birds, I was the only one eating it. And that meant, tons of leftovers. So, I used the meat in a creamy, crunchy, sweet and savory chicken salad…Mmmm! I cleaned the remaining meat off of the bone and cut it into chunks. I added light mayonnaise, thinly sliced celery, red grapes, green onion, honey roasted almond slices and a little salt, fresh ground peppercorns and dill weed. For an added flavor, I tossed in some dried blueberries. Dried cranberries or cherries would be good too.
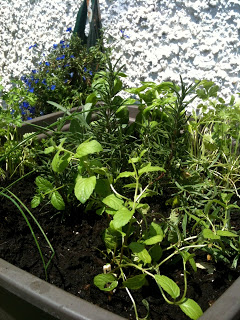
It’s always been the general rule of thumb, at least with my family here in the mid-west, that nothing gets put in the ground until after Mother’s Day. Still some cool nights, but beautiful warm days and no worry about frosts. I would love to have a huge yard with space for an amazing garden. However, my house, a lovely old home that has been in my family since the early 1900’s, has the tiniest yard. Great if you don’t like to mow, but not so wonderful for gardening. So, I make do with a container garden. I have a tomato plant, some jalapeños and my herb garden, of course. The invention of the hanging garden bags has provided the option of a few more plants as well.
This weekend was an amazing weather weekend, perfect for yard work and planting! I went to a local market and greenhouse on Saturday to purchase hanging baskets, flowers to plant and the herb and vegetable starts. I have tried a couple of times to start my herbs from seed, but I wasn’t very successful. So, what herbs do I plant??
I plant all my favorites, especially those that I need for salsa and other summer grilling recipes. My herb garden this year includes: Rosemary, Cilantro, Chives, Mint, Thyme, Tarragon, Sage, Parsley and Basil. Given plenty of sun, moist soil and pruned occasionally (which is easy since I will cook with the fresh herbs on nearly a daily basis), the plants will provide herbs all summer. If you have a place inside your home that is conducive to good growing, you can move the herbs indoors when the weather gets cold. Herbs can also be frozen to be used in cooking whenever the recipe calls for fresh herbs.
I recently made quick and easy chicken and steak fajitas using the Cilantro I had leftover from making salsa, and didn’t get that posted (yet) but watch for more recipes using fresh herbs to come! Because of their wonderful fragrances, herbs can be used for other purposes too. A new favorite room freshener of mine combines a lemon cut in half, a few sprigs of fresh Rosemary and a couple tablespoons of vanilla. Place in a small saucepan half filled with water. Put on the stove and simmer to fill your home with a fresh scent. I actually put a small bowl in one of our vehicles overnight to help remove “wet dog” smell…it worked great!
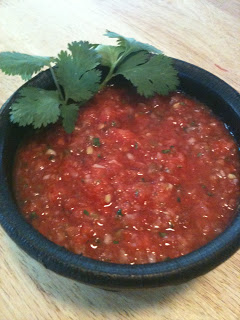
Just in time for Cinco de Mayo, comes another of my favorite herbs: Cilantro! And, how better than to incorporate this fresh and flavorful herb in a recipe than Salsa!?!
The one thing I have found is that people either love cilantro or they really don’t like it…there aren’t too many in between. It has a very distinct flavor that leaves no question about whether it can be found in the recipe. Even if you love it, be cautious because you can use too much of it. Cilantro is the leaf of the plant and coriander is the seed. Even though they come from the same plant, their tastes are very different and they can not be used to replace each other in recipes. Cilantro is wonderful fresh, but can also be found in dried spice form. The best way to store fresh cilantro is to make a new snip on the stems and place the bunch in a cup of water like you would a flower bouquet. Depending upon how quickly you will use it, you can store it on a counter or in the refrigerator. Wash and gently pat dry just before using. The leaves and stem can be used. Cilantro is often found in Mexican and Latin American recipes, but is also found in Middle Eastern, Mediterranean, Indian, South Asian, Chinese, African and Southeast Asian cuisine.
Technically, my salsa is a pico de gallo. What’s the difference, you ask?? The difference between salsa and pico de gallo is whether it is cooked or fresh. Salsa is made with cooked ingredients and pico is made by chopping and mixing fresh ingredients. However, the term “salsa” is pretty much used to describe any sauce, red or green, sweet or spicy, chunky or smooth, that is made from the basic base of tomatoes, onions, garlic, peppers and vinegar. The best part about this sauce is you can make it any way you like it. There are so many variations and things that can be added: corn, black beans, fruits (mango, pineapple and raspberries are some of my favorite!), and peppers (jalapeno, habanero, and chipotle [roasted peppers]). The other aspect you control is the amount of heat. Depending upon which peppers you use, how many of those peppers and whether you leave the seeds and veins intact. TIP: to easily remove the seeds and veins from the peppers, use a grapefruit spoon.
I suppose I really shouldn’t refer to this as a recipe for salsa, but really more as a framework. There are so many variables that influence the exact amount of each ingredient, that really the best thing you can do is add some of each thing, sample and adjust according to your taste. You never know how ripe and flavorful the tomatoes will be so you may need to add tomato paste to spark up the flavor a bit. I always dig to the bottom of the bin at the grocer’s and chose tomatoes that are almost over-ripe. Roma tomatoes are my favorite for cooking because they are more “meaty.” Peppers can vary in heat, so always start with a little then add more if needed…you can’t take the heat back out easily. Also, the longer the salsa sits, the hotter it will become. Salt and sugar work together, so add a bit of both at the same time. And, again, cilantro has a very strong flavor so add sparingly. For the acid, I typically just use white vinegar, but sometimes add a little fresh lemon or lime juice for a different flavor.
Salsa Fresca
8-10 really ripe Roma tomatoes
2-3 jalapeños depending upon size and heat
1/2-1 habenaro (optional…if you like it HOT)
1 large Texas sweet or Vidalia sweet onion
4-5 cloves of garlic (about 4t minced if you use jarred instead of fresh…either works)
a handful cilantro (more or less depending on how much you like that flavor)
1 small can tomato paste (use 1/2-whole can depending on ripeness of tomatoes and for thickening)
1/4 C white vinegar
1/4-1/2 C sugar
1-2 T kosher or sea salt
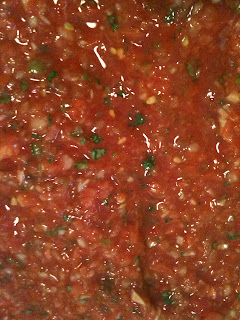
You can prepare this salsa by hand chopping all the ingredients, and if you like yours more chunky, that is probably what you would want to do. It can also be made using a food processor or even a blender. I prefer mine to be less chunky and thick, so I use my food processor. I have an awesome processor that does large pieces of food in large amounts, so I only have to peel and rough chop the ingredients and toss them in. I can also make a decent sized batch in one processor bowl. However, because of the massive amounts of salsa that are eaten by my family, friends and co-workers, I make multiple bowls and mix them together in one very large bowl before pouring into various containers for distributing and storing. This salsa lasts for quite awhile in the refrigerator. I would like to be able to tell you exactly how long, but it rarely lasts more than a week in my house before being devoured!
- 8-10 really ripe Roma tomatoes
- 2-3 jalapeños depending upon size and heat
- ½-1 habenaro (optional...if you like it HOT)
- 1 large Texas sweet or Vidalia sweet onion
- 4-5 cloves of garlic (about 4t minced if you use jarred instead of fresh...either works)
- a handful cilantro (more or less depending on how much you like that flavor)
- 1 small can tomato paste (use ½-whole can depending on ripeness of tomatoes and for thickening)
- ¼ C white vinegar
- ¼-1/2 C sugar
- 1-2 T kosher or sea salt
- Place ingredients in a food processor or blender (hand chop if preferred)
- Blend to desired consistency


